Evil Dead Cabin Shot. Has the Axe, the Boomstick, The Necronomicon, the porch swing, the classic Oldsmobile that Sam Raimi Puts in all of his movies. Effects include lighting with projection mapping, Layered Fog, Omni Lights for the porch lights, and an Environment/Sky Map (the change is subtle).

This…

Posted: October 16, 2012 in Uncategorized

IS MY BOOM STICK!


Come get some.


A hallway done as closely as I could recreate from the movie Event Horizon.  It was done with Mental Ray lighting and materials with my own materials projected onto them.

Some New Things

Posted: October 8, 2012 in Uncategorized

Here are a few things I modeled tonight. I was feeling really festive because of Halloween being right around the corner, and it being my favorite holiday. I had this burning need to make a pumpkin so I made it happen. I also modeled a wood axe, which is an asset for one of my next school projects. Enjoy! And, as always feel free to speak your mind on what you see. Happy holidays guys (The good ones)!

This is what I did first. Just a whole pumpkin just like you would get from the store.

This was the next phase of the pumpkin. I carved it just like you would a real pumpkin. It was important for me in the tradition of the holiday to start out with the whole pumpkin and carve it just like real life.

This is a wood axe for an Evil Dead Cabin scene that i’m doing for class. It’s just a minor asset but it was important for me to include it because it was a main staple in the movie among other items.

“Sci-Fi Hallway”

Posted: August 9, 2012 in Uncategorized

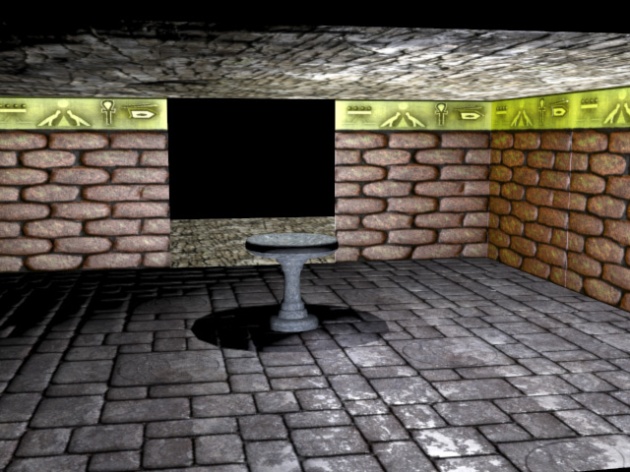
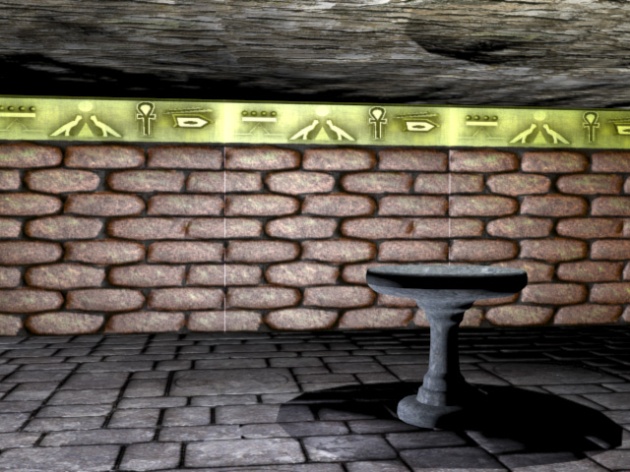
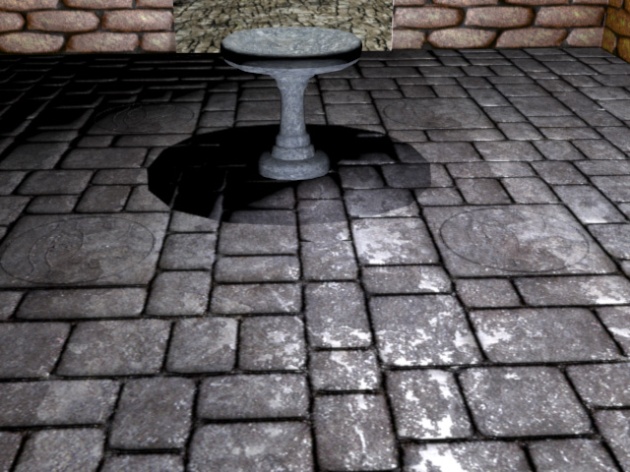
I would liken this more to fantasy I guess or adventure than sci-fi but we were allowed to pick the theme for the room and hallway we had to do.  Me and my partner in class Chris did this.  As of now we took some renders of the scene almost finished but not quite.  The pieces are finished minus a pillar that isn’t in the scene yet, mapping and everything they just weren’t completely snapped together so the wall pieces still display a seam but the wall is in fact tileable to where you can’t see the seam.  The idea was to create a room with specific dimensions and tri limits that were given to us, using modular pieces aka pieces that could be used more than once in the “game”, or could be tiled which ends up saving on resources in the end.  Here is a breakdown of what each of us have done:


Me:

Wall Piece

-Normal Map

-Diffuse Map

-Lighting and AO Map

Pillar High and Low Poly

-Normal Map

-Also cut out some hieroglyphics

to be included in the diffuse


Chris:

Ceiling Piece

-Normal Map

-Diffuse Map

-Lighting and AO Maps

Floor Piece

-Normal Map

-Diffuse Map

-Lighting and AO Map

Torch/Fire Fountain

-Normal Map

-Diffuse Map

-Lighting and AO Map

-Lights in the scene for

the Torch/Fountain


Here is what we have so far at about 90% finished.  I will post up more renders of everything fit together seamlessly and correct when we’re done and hand it in.  I’m pretty proud of what we did here!  I def learned a lot about smoothing groups and such.

Image


Image


Image

This is the ammo crate we did for class.  I posted up some pictures of the low poly in the last entry but that particular model has been long since discarded.  I ended up weaving fatal construction problems into it and had to start completely over.  The second go at it though I was able to do it very fast and efficiently.  So i’m going to show you 3 things:  1.  The new low poly which is essentially just the finished product with the mapping on it which consists of a diffuse, ambient occlusion, and normal map.  2.  The high poly which was used to generate the normal map for the low poly/finished piece.  3.  My UVW Unwrap which became my diffuse map.  I hand drew all color on the mapping save for the dark gray panels which for one reason or another don’t show up as strongly as i’d like them to.  I think I did a pretty good job drawing the crate texture.  It was done in photoshop with my wacom drawing tablet.  I just used a variety of different brushes, colors, etc to make it look beaten, dirty, and rusty.  It’s my first Unwrap so it’s not perfect and I had to improvise by placing a marble texture map on some of the ridges so it didn’t look jenky but I think that I did a decent job overall.  I saw some cool ink style hashing on some Geiger pieces that i’d like to try to add to my maps at some point but since the hardest part is letting go and just letting it be done flaws and all i’m letting it go.  So without further adieu (I think that’s the proper way to spell it, if not we’ll arm wrestle to determine the winner), here is my take on the ammo crate from Dead Space

ImageImage

Image

Image

My take on the ammo crate from deadspace

Image

Image

This is an assignment I did for my Video Game Art I Class that was meant to refresh us of the basics of UVW Mapping and teach us the Fundamentals of UVW Unwrap in 3ds max.  The mapping on the objects was jacked up and we had to use those two modifiers to make the maps display correctly.

Image

Picture Frame For Fun

Posted: June 3, 2012 in Uncategorized

Just did this for fun to brush the dust off between semesters.  The maps I just took arbitrarily from royalty free google searches.  They’re not fantastic but it’s a low-interest background object so I think it would fit in the background ok.  It’s also unfinished at this point.  Just trying to get into the habit of posting stuff in this.

Image